TUTORIALS
The student can CHAT with the MENTOR and the WIL Coordinator / Lecturer from the University / TVET COLLEGE via the CHAT ROOM. The Mentor and WIL Coordinator will receive an Email Alert whenever a new Chat message is sent. The WIL coordinator and Mentor can respond to the Chats via the CHAT ROOM on their WIL Portal access.

The purpose of Registration is to ensure that the lecturers can monitors, manage, and assess the Student’s WIL Training from the start of the training.


Onsite Visitation by the Lecturer is a mandatory requirement to monitor the quality of student Training.
The Lecturer schedules the Onsite Student Visitation via this Menu. Students are alerted to the schedule, and they confirm acceptance.

The Mentor can engage in Incoming and Outgoing chats with STUDENTS and LECTURERS and real-time. The Mentor can also Attach Documents to the chats

The assessment sheet menu's explained:


Mentors receive email and System Alerts to Assess Student Progress Reports after the Reports are submitted by the Students.


MENTORS cannot ADD a new Student to the Mentor’s Assessment Sheet. Only a Student can ADD, CHANGE or EDIT MENTORs from their Menu. After a Student changes to the new Mentor from the Pull-Down List of existing Mentors, the Academic would be Alerted to Approve the change. After that, the New Student would appear on the Assessment Sheet of the Mentor.
Students can submit Task Reports ONLY AFTER their ONLINE WIL REGISTRATION has been approved by the Academic(WIL COORDINATOR). After the Academic has approved the student’s online registration, the student will receive an alert via email, informing them that their ONLINE WIL REGISTRATION HAS BEEN APPROVED. An email alert is also sent to the MENTOR that the student has registered on the system with their Login details to gain access to the system and assess the student accordingly.
1. Students need to make sure that they have the correct details of their mentor. The MENTORS Email address is important as that is used to ensure that the MENTOR is alerted when they are registered on the system and be alerted each time a student submits a task report. Students can change or edit their MENTORS Email address by going to the ONLINE WIL REGISTRATION TABLE and scrolling down to their mentors details and clicking on the blue button provided to change or edit their MENTORS details.
Students can also use the CONTACT US menu provided to get help from the support team to investigate as to why their MENTOR did not receive their login details
1. Students need to make sure that they use their TUT4LIFE Email in order to register on the WIL PORTAL. Upon signing up students will be able to view the email address registered on the TUT ITS System and have the option to change this email address. It is compulsory that ALL students use their TUT4LIFE email address to SIGN UP on the WIL Portal. This prevents confusion to the student as to which email was used to SIGN UP onto the WIL PORTAL.
Students can also can use the CONTACT US menu provided to get help from the support team to investigate which email address was used upon Signing Up on the WIL PORTAL. The support team can help change the students Email address to their TUT4LIFE email that is required.
This message alert indicates that the student has not yet registered on the TUT ITS system. In order to Sign Up onto the WIL PORTAL, all students are required to FIRST register on the TUT ITS system then Sign Up on the WIL PORTAL PORTAL.
This message alert indicates that the Qualification that the student is attempting to register for is not yet populated on the WIL PORTAL. Students need to use the CONTACT US menu to contact the support team to do an investigation as to which qualification is not live on the WIL PORTAL.
1. Students can contact their Academic in order for them to change the start and end date. Academics can change the start and end date of a student from their profile.
1. Mentors receive email and System Alerts to Assess Student Progress Reports after the Reports are submitted by the Students.
The Mentor is taken through a Step-by-Step process to Assess the Student’s Progress Report and to provide Feedback to the Student.

The Mentors and Lecturers are alerted to Assess the WIL Outcomes that the Student completes.
The Mentor is taken through a Step-by-Step process to Assess the Student’s achievement of the WIL Outcome, similar to the procedure followed in Assessing the Student's Progress Reports.
1. When this occurs it indicates that the student has not used the correct email address of the Mentor when the student was completing their ONLINE WIL REGISTRATION. The Student would have to go onto their ONLINE WIL REGISTRATION table and change the mentor details. Once the student has changed the Mentor details, it will then be sent to the Academic to approve in order for the student to reflect on the Mentors Assessment Sheet.
This can also occur when the Students ONLINE WIL REGISTRATION has not yet been Approved by the Academic. Only upon approval will the student appear on the Existing Mentors Assessment Sheet.
The Lecturer also referred to as the WIL Coordinator or Academic, is responsible for managing Work Integrated Learning (WIL) Students within the Qualification in the respective Department. The Lecturer's responsibility includes the Monitoring and Supervision of the Students, Assessment of Student Reports, and Assessment of Work Integrated Learning Outcomes. The Primary Lecturer is responsible for Work Integrated Learning Management within the respective Qualification. The Primary Lecturer can assign Students to Secondary Lecturers for management and assessment purposes. The Primary Lecturer can view the progress of all students within the Qualification. The Secondary Lecturer can only view the students who had been assigned to them.
The Primary LECTURER is responsible for:
• Approving the Online Registration of WIL Students
• Assigning WIL Students to Secondary Lecturers.
• The Assessment of the Student's Progress Reports
• Monitoring all Student and Industry Mentor activities.
• The approval of Industry Mentors
• Approval / Accreditation of Employers / Workstations
• Scheduling onsite student visitation
• Tracking the completion of the WIL training
• The Primary Lecturer assigns one or more Students to Secondary Lecturers to manage.
• The Secondary Lecturer can only View and Manage the Students who are assigned to them by the Primary Lecturer
• The Secondary and the Primary Lecturers’ responsibilities are the same.
Students are required to Register their WIL TRAINING before the start of their Training. The Lecturer must APPROVE the WIL Registration by checking the credentials of the Employer and Mentor to ensure that the Student can achieve the WIL Outcomes.
EMPLOYER APPROVAL- The Lecturer first checks whether the Employer is Accredited / Approved to train WIL Student. If the Employer is not Approved, the Lecturer can either Provisionally or Fully Approve the Employer.
MENTOR APPROVAL- The Lecturer must also Approve the Mentor if the Mentor is not already Approved.
The students add the employers name when they submit their online applications. The lecturer must search the employer database to ensure that the student did not duplicate an employer name. Often students mis-spell employer names and add the same employer multiple times. The lecturer is responsible for deleting the multiple entries of the same employer, editing employer names and adding new employers on the employer database

{{ADDING_NEW_MENTORS_AND_WORKSTATIONS_TO_PORTAL_D}}
EMPLOYER APPROVAL
All Employers that train WIL STUDENTS must be APPROVED by the University or TVET College for each WIL qualification. LECTURERs can PROVISIONALLY APPROVE a new Employer to allow Students to Register their WIL Training pending the FINAL APPROVAL of the EMPLOYER.
EMPLOYER ACCREDITATION CERTIFICATE
After the FINAL APPROVAL of the Employer, the Lecturer can DOWNLOAD the EMPLOYER ACCREDITATION CERTIFICATE and issue the CERTIFICATE to the EMPLOYER.
The Accreditation Certificate is valid for three (3) years. After that, the Employer must be re-Accredited and issued a new Certificate


When this occurs it indicates that the student has not used the correct email address of the Mentor when the student was completing their ONLINE WIL REGISTRATION. The Student would have to go onto their ONLINE WIL REGISTRATION table and change the mentor details. Once the student has changed the Mentor details, it will then be sent to the Academic to approve in order for the student to reflect on the Mentors Assessment Sheet.
This can also occur when the Students ONLINE WIL REGISTRATION has not yet been Approved by the Academic. Only upon approval will the student appear on the Existing Mentors Assessment Sheet.


PROCESS 1: STUDENT ONLINE REGISTRATION
Students are required to Register their WIL TRAINING on the WIL PORTAL within 7 Days of the start of their Training. Registration aims to ensure that the Lecturers can monitor, manage, and assess the Student WIL Training from the beginning of the Training. After the Student submits the Online WIL Registration, the Lecturer will receive an alert to APPROVE the Registration. The Lecturer must check the Student's Academic credentials, Employer Name, Workstation Address where the Student would be based, Mentor's Name, Email Address, and Telephone Number are correctly completed by the Student. The Workstation Address is the Physical Address where the Student would be stationed during their Training. The Lecturer must also check the credentials of new Employers and Mentors before provisionally approving them.
PROCESS 2: ASSESSMENT OF PROGRESS REPORTS

STUDENTs are required to submit their regular PROGRESS REPORTS in terms of the Qualification Rules. The Student would receive regular reminders to submit their Progress Reports on time.
When the Student submits their Progress Reports, the Student will be requested to:
a) Attach one or more optional supporting documents to the Report
b) Link the Report to the relevant WIL Outcome
c) Conduct a Self-Assessment of their performance
After the Student Submits the Report, the Industry Mentor receives an email Alert to Assess the Student's Progress Report.
After the Industry Mentor completes the Assessment, the Lecturer gets an email alert to Assess the Student's Report.
The Student, Mentor, and Lecturer can view the Assessments in real time.
TIP: Students are advised to prepare the WIL Reports in MS WORD document and then Paste the Report onto the WIL PORTAL.

PROCESS 4: STUDENT PROGRESS/TASK REPORT SUBMISSION PROCESS FLOW
STUDENTs must submit regular PROGRESS / TASK REPORTS according to the Qualification Rules. A typical Report format should include an Introduction, Body, and Conclusion. However, some Progress Report formats may be different. Refer to the Qualification Rules for the required format
1
| START DATE AND END DATE
The start and end dates refer to the Progress Report dates. |
2
| Task/Project Description
This section will include the Introduction and Body of the Report as described below. 2.1 Introduction
The introduction usually covers the description of what was done during the period of the Progress Report. 2.2 Body of the Report The body of the Report should typically address:
• What procedure did the Student follow in completing the Task • Any analysis, measurements, or evaluations performed during the Tasks • Any results or achievement of the desired outcome
2.3 Conclusion
The conclusion should include reflective practice such as what was learned by the Student, whether the Tasks could have been done differently, efficiently, or more cost-effectively, or any other value-adding suggestions. 2.4 Embedding Images into the Report Students can INSERT an Image at any point in the Report by RIGHT CLICKING the Mouse and Selecting INSERT IMAGE. The Student must assign a descriptive LABEL to each Image. |
3
| ATTACHMENTS
The Student can Attach one or more optional supporting PDF Documents to the Report. |
4 LINKING TASK REPORT TO WIL OUTCOMES
The Student would be required to link the Report to one of the relevant WIL Outcomes. |
5 STUDENT SELF ASSESSMENT
Before submitting the Report, the Student would be required to perform a Self-assessment of their performance. While the Self-Assessment does not contribute to the final Assessment, allows the Student to reflect on their work and acquaint themselves with the Assessment Criteria that the Mentor and Lecturer would apply.
|
6 SUBMISSION OF PROGRESS REPORT
After the Student submits the Progress Report, the Mentor receives an email alert to Assess the Report. After the Mentor completes the Assessment, the Report is forwarded to the Lecturer.
|
PRACTICAL TIP
It is recommended that the Student first draft the Progress Report in MS Word, and then check for Grammar and Spelling errors by using the online service at www.grammarly.com. After ensuring that the Report is error-free, the Student must Copy and Paste the Report onto the WIL Portal.
|

PROCESS 5: VISITATION SCHEDULE

11. WHAT IS A STUDENT TRAINING PROGRAM
A Training Program is a training and learning activities schedule designed to guide Learners for the duration of their training period with an Employer. A Training Program does not have to be detailed. It contains essential information such as: what tasks are planned, when is it going to happen, how long will each task take, and where will it be done. The Program is a vital roadmap to GUIDE both the Mentors and the Learners on the training schedule. Mentors need to spend a little time planning the broad areas and activities that Learners will cover during their training period with the Employer or Workstation. The Training Program should include the location or Department where the Learners would have to report and estimated timeframes of each area of Training Activity.
The Training Program can be a Summary of the Tasks, or it can be expanded to provide a more detailed Schedule of Weekly Activities for the Learner to follow during their Training, as illustrated in the 2 Tables below.


This is where students need to confirm their email address and only will be allowed to use their TUT4LIFE email address in order to sign up on to the portal
This is where students fill in their details to sign up on the portal.
Step 1- This is where students confirm their personal details.
STEP 2- This is where the students will select the WIL Qualification that they are doing and put in their start and end date of their WIL training.
Step 3- This is where students can add their employers onto the system and they have the option to search the employer to see if they are already on the portal database.
Step 4- Students can add their mentors to the portal. They need to ensure that the mentor's email address is correct so the mentor can receive their login details for the system after the Academic has approved the student's registration. The student can add a new mentor or have the option to search for the mentor under the "Existing Mentor" button.
Step 5 - This is where students type in their Work placement address and information about where they are conducting their WIL Training.
Step 6- Students would have to read and understand the Undertaking and Indemnity from the University. Students will have to upload their letter of employment as well as proof that they have been successfully placed at a reputable company to conduct their WIL Training.
Step 7 - This shows that the student has completed their Application and they will given instructions on how their application will be approved and when their mentors that they have registered will be approved.
This feature allows students to view and schedule site visits related to their WIL program.
If their academic supervisor or mentor has scheduled any visitations, students can see the details, such as date, time, and location.

The Mentor can engage in Incoming and Outgoing chats with STUDENTS and LECTURERS and real-time. The Mentor can also Attach Documents to the chats


It strengthens account security by requiring a unique code from the app in addition to your usual password
Once the mentor has logged into their account, it is recommended to set up Google Authenticator for easy access to student assessments on the go via their mobile phone.
The mentor should click the dropdown menu in the top right corner of the screen, where their name is displayed, and select the 'Google Authenticator Setup' option

Setting up Google Authenticator enhances the security of your account by adding an extra layer of protection. Follow the steps below to complete the setup:
1. Download and install the Google Authenticator app from the Google Play Store or Apple App Store.
2. Open the app and tap 'Get Started.'
3. Choose to either scan the QR code or enter the provided setup key manually.
4. Use your phone's camera to scan the QR code displayed below.
5. Once added, enter the generated code to finalize the authentication setup.
Upon signing in, mentors will be directed to the 'Student Management' page, where they can view both 'Students in Training' and 'Students Who Have Completed Training.

Mentors can access student Task Reports and Outcomes by clicking the 'VIEW' button on the right side of the table.

After clicking the 'VIEW' button, the mentor will be able to see the student's personal details, training duration, and progress report, including any pending assessments.

To access the student's Task Report and Outcome, the mentor must click on the red flashing number as shown in the image below.

After clicking the red flashing number under 'Student Progress Report Pending Assessment,' the mentor will be redirected to a new window displaying the student's personal details, academic information, and progress reports pending assessment.

After the mentor clicks the blue 'Pending Assessment' button, as shown in the image above, they will have two options: 'Editorial Change' or 'Assess the Student's Report’

When the Mentor selects the Assess Student Report option, a new tab will open, allowing them to submit marks based on the assessment criteria provided by the department. After submitting their marks, approving or not approving , the Mentor has the option to provide feedback. Once completed, they must click Save to finalize the process

When the Mentor selects the Make Editorial Change option, a new tab will open displaying the student's submitted Task Report. Here, the Mentor can highlight any word or paragraph they wish to comment on. By right clicking the highlighted section, an option to Add Editorial Change will appear.

After clicking the Add Editorial Change button, a pop-up will appear, allowing the Mentor to type their comments for the highlighted section in the provided text box. Once the comments are entered, they must click Save to finalize the changes.

Once the Mentor clicks Save to finalize the changes, their comments will appear on the right-hand side, as shown in the image below. The Mentor must then click the Send Changes to Student for Correction button below the table to notify the student of the suggested changes

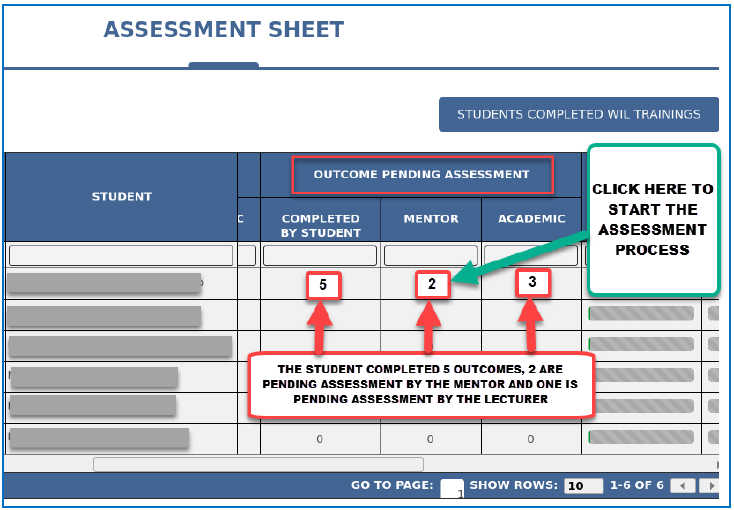
To access a student's Outcomes, the Mentor must open the student's details and scroll down to view the number of Outcomes Pending Assessment, as shown in the image below. To proceed, the Mentor should click the red flashing number under the Outcomes Pending Assessment section in the Mentor column.

After the Mentor clicks the red flashing number, a new tab will open, allowing them to view all the outcomes submitted by the student.
To assess the outcomes submitted by the student, the Mentor must click the blue Pending Assessment button located on the right-hand side of the table. After clicking Pending Assessment, the outcome will open in a new tab, allowing the Mentor to assess it.

The Mentor can then scroll down to make their assessment, using the Outcome Assessment dropdown to either Approve or Not Approve the student's task report. They will also have the option to provide feedback. Once completed, they should click on Save to complete the process.

Enter a report title and select an outcome from the provided list. Click on the outcome title for details.

Provide a task name along with an introduction, body, and conclusion. Progress reports must follow qualification guidelines.


Progress reports are linked to WIL outcomes. Students indicate if the linked outcome is complete and ready for evaluation by Selecting “Yes” under “Is Outcome ready to be assessed by the Mentor and Lecturer”.

Assign a self-assessment score out of 100% based on workplace training.

Upload necessary supporting documents. Additional files can be added using "Add more files."

Progress Report Submission
The student can either submit the progress report immediately or save it as a draft.
SUBMIT: the mentor will be notified to assess the report, followed by the lecturer's review. Feedback can be viewed under "Reports and Assessment."
REPORT SAVED AS DRAFT
Draft reports will appear in the "reports and assessment" tab for future editing and submission. The student can edit the draft and submit it for assessment when ready.

A "Submit Offline Report" button is available for students to create and submit new reports aligned with their learning outcomes when they have no access to the Internet and later submit the report when their connection is restored

This section navigates to a dedicated page that lists all submitted task reports and outcomes
Students can review their previously submitted reports, outcomes and track feedback, or scores provided by their assessor.
This option opens a page where students can access all essential WIL-related documents, such as their qualification’s logbook, student manual, Portfolio of Evidence, Student Registration Record, Final Report and Forms and Templates.

Students can download or view these documents directly within the system for easy reference throughout their training.
Under the “Forms and Templates” tab students can download, complete, and upload signed forms directly to the system. (See below screenshot)

This feature allows students to view and schedule site visits related to their WIL program.
If their academic supervisor or mentor has scheduled any visitations, students can see the details, such as date, time, and location.

1. Upon logging in, students will see their WIL Registration Status displayed. If incomplete, a message will prompt them to click the blue "Click to Register for WIL Training Online" button.
2. After clicking the button, students will be guided through a 7-step process to complete their WIL registration

Students must verify their personal information, including campus, address, and contact details. After confirming and entering the required information, click "SAVE" to proceed.

Select the WIL module from the drop-down menu and enter the start and end dates for your WIL training. Review and confirm the details, then click "SAVE" to proceed.

Search for an employer by typing the first few letters of the company name. A matching list will appear. If the employer is not listed, select "ADD a new Employer or Organization." Ensure the name reflects the parent company (e.g., ESKOM, SIEMENS, VODACOM).

Enter the mentor's name, mobile number, and email address. This information is mandatory as the mentor will receive their login details via email once the WIL Coordinator approves the registration.
Change of Mentor
Mentor details can be updated, added, or changed anytime through the [ONLINE WIL REGISTRATION MENU].

The WIL Placement is the physical location where the student will complete their training. If the organization has divisions, use the division name as the workstation. For smaller organizations without divisions, use the company name.

Students must read the indemnity carefully and upload their Letter of Employment before clicking "Agree and Continue."

Upon completing registration, the assigned TUT lecturer will receive a notification to approve the WIL registration. Once approved, both the student and industry mentor will receive a confirmation email. The mentor will also receive a username and password to access the student’s progress where it is the first time they are using the system.
Students can click the "Online WIL Registration" button to return to their registration details.

In the WIL Registration details, students can view their registration status (Pending or Approved). The example below shows a "Pending" status in the top left corner.

Clicking the "Home" button brings students back to their main WIL landing page, as described above. This serves as the central dashboard where students can monitor their progress, view employer information, and access pending assessments and reports.
A "Submit New Report" button is available for students to create and submit new reports aligned with their learning outcomes.
Submit New Progress Report
Students follow a 6-step process to submit a task report:
1. Once all steps are completed, approve the student's WIL registration by clicking the green button at the bottom of the table.
2. If errors are identified in the registration, you have the following options:
Click Send to Edit to return the registration to the student for corrections.
Click Delete to remove the registration entirely.
This process ensures accurate records and seamless registration for WIL activities.

Before approving, you may download the student's registration by clicking the Download button for your records

When the Academic selects the Make Editorial Change option, a new tab will open displaying the student's submitted Task Report. Here, the Academic can highlight any word or paragraph they wish to comment on. By right clicking the highlighted section, an option to Add Editorial Change will appear.
After clicking the Add Editorial Change button, a pop-up will appear, allowing the Academic to type their comments for the highlighted section in the provided text box. Once the comments are entered, they must click Save to finalize the changes.
Once the Academic clicks Save to finalize the changes, their comments will appear on the right-hand side, as shown in the image below. The Academic must then click the Send Changes to Student for Correction button below the table to notify the student of the suggested changes
Under Employer Management, the Academic can view the details of approved employers and has the option to edit their information.

Under View Details, the Academic can access all information related to the employer and has two options: Issue Certificate to the employer or Download Accreditation Certificate

Under Qualification Management, Academics can view the qualifications they are linked to and access the details of each qualification by clicking the View button.
Academics also have the option to add students manually to the student by clicking the “Add Student” Button located above the table.


After clicking the View button, the Academic can access all qualification details and has the option to download the logbook by clicking the Qualification Logbook button located on the right-hand side of the page.

Scrolling further down, they can view student records and have the option to edit the students' information


The Onsite Visitation Scheduler allows the Academic to select the students they wish to schedule a visitation with by checking the box on the right-hand side of the table under Select Student to be Visited. They can then proceed by clicking the Schedule Visitation button located above the table.
Academics have an option to download the list of visitations they have scheduled

After clicking the Schedule Visitation button, the Academic will be presented with a pop-up, as shown in the image below, where they can set the date, time, and add notes. Once the information is entered, they can click the Schedule Visitation button to confirm.

This feature allows Academics to create broadcast messages for their students, with the option to archive these messages as needed.

Upon clicking the Broadcast Message button, the Academic will be directed to a page where they can select the role and enter all the necessary information to create the broadcast message. They will also have the option to save it as a template for future use.

Is a feature where lectures have the options to download both Student Status for Specific Qualifications and Students Final Report BY simply clicking on any of the 2 that will download in an Excel format.

This section allows Academics to view all support ticket queries submitted by students and mentors. While the WIL admin is responsible for addressing these queries, Academics also have the option to assist with resolving them.

Academics have the option to create folders for support tickets, move tickets between folders, view resolved tickets, archive tickets, and access attended tickets, by clicking on the buttons located above the table.
To open a ticket, the Academic must click on the query's subject located in the Subject (Click to View) column of the table.

When the Academic clicks on the subject to open the query, a pop-up will appear, allowing them to type a response advising the student or mentor on the next steps. If the Academic is unsure how to address the query, they can click the Action button, which opens a dropdown menu with the option to escalate the ticket to OLUMS Support for further assistance.

The Contact Us feature enables Academics to directly submit their queries to the WIL Admin. The WIL Admin will receive the query, address the issue, and maintain direct communication with the Academic until the issue is resolved.

Through the chat feature, Academics can communicate with the WIL Admin, students, mentors, and secondary academics. To start a conversation, they simply click the Chat button to open the message box, where they can type their message and attach files as needed.

Clicking the red flashing number under Student Progress Report Pending Assessment in the Academic column will open a new tab displaying all the Task Reports submitted by the student.

To assess a student's Task Reports, click the blue Pending Assessment button located on the right-hand side of the table. The Academic will then be presented with two options: Assess Student Report or Make Editorial Changes.
Assessing Student Report
When the lecturer selects the Assess Student Report option, a new tab will open, allowing them to submit marks based on the assessment criteria provided by the department. After submitting their marks, the Academic has the option to provide feedback. Once completed, they must click Save to finalize the process.

To access a student's Outcomes, the Academic must open the student's details and scroll down to view the number of Outcomes Pending Assessment, as shown in the image below. To proceed, the Academic should click the red flashing number under the Outcomes Pending Assessment section in the Academic column.

After the Academic clicks the red flashing number, a new tab will open, allowing them to view all the outcomes submitted by the student.

To assess the outcomes submitted by the student, the Academic must click the blue Pending Assessment button located on the right-hand side of the table. After clicking Pending Assessment, the outcome will open in a new tab, allowing the Academic to assess it.
The Academic can then scroll down to make their assessment, using the Outcome Assessment dropdown to either Approve or Not Approve the student's task report. They will also have the option to provide feedback. Once completed, they should click on Save to complete the process.

Academics can view a list of students currently awaiting approval for their WIL training.
To review and approve or disapprove a student's WIL registration, follow these steps:
Click the "View" Button
Locate the blue "View" button on the right-hand side of the table for the student you wish to review.

Review Student Details
• Access the student's submitted information and details for WIL registration.

Approve or Disapprove
After reviewing the details, make your decision to approve or disapprove the registration.
This streamlined process ensures all necessary information is readily accessible for a smooth approval workflow.

STEP 1 - VERIFY AND ADD EMPLOYER INFORMATION
• Check if the employer's details already exist in the portal.
If they do, merge the new entry with the existing record.
If not, add the employer information as a new entry.
Note: Students may accidentally duplicate employer records by entering new details without checking existing ones

check if the mentor's details already exist in the portal.
• If they do, merge the new entry with the existing record.
• If not, add the mentor information as a new entry.
Note: Students sometimes create duplicate mentor records by slightly altering email addresses, which can cause login issues

check if the workstation's details already exist in the portal.
• If they do, merge the new entry with the existing record.
• If not, add the workstation information as a new entry.

check if the workstation's details already exist in the portal.
• If they do, merge the new entry with the existing record.
• If not, add the workstation information as a new entry.

Confirm the mentor meets the necessary knowledge and qualifications to effectively train students.


When students first log into the system, they will be directed to their main WIL workspace. This area serves as the central hub for managing their WIL journey.
Left Panel (Communication and Support Tools):
Chat Room: Enables students to message their lecturers and mentors directly within the platform (Note: Although the icon resembles WhatsApp, this feature only works within the portal).
Contact Us: For raising support queries related to the portal.
FAQ: Provides answers to frequently asked questions for guidance.
Top Ribbon (Navigation Bar):
Home: Returns to the main dashboard view.
Reports and Assessments: Access reports and submit assessments.
Onsite Visitation Scheduler: Schedule and view site visits related to WIL activities
Students can submit Task Reports ONLY AFTER their ONLINE WIL REGISTRATION has been approved by the Academic(WIL COORDINATOR). After the Academic has approved the student’s online registration, the student will receive an alert via email, informing them that their ONLINE WIL REGISTRATION HAS BEEN APPROVED. An email alert is also sent to the MENTOR that the student has registered on the system with their Login details to gain access to the system and assess the student accordingly
Students need to make sure that they have the correct details of their mentor. The MENTORS Email address is important as that is used to ensure that the MENTOR is alerted when they are registered on the system and be alerted each time a student submits a task report. Students can change or edit their MENTORS Email address by going to the ONLINE WIL REGISTRATION TABLE and scrolling down to their mentors details and clicking on the blue button provided to change or edit their MENTORS details.
Students can also use the CONTACT US menu provided to get help from the support team to investigate as to why their MENTOR did not receive their login details
Students need to make sure that they use their TUT4LIFE Email in order to register on the WIL PORTAL. Upon signing up students will be able to view the email address registered on the TUT ITS System and have the option to change this email address. It is compulsory that ALL students use their TUT4LIFE email address to SIGN UP on the WIL Portal. This prevents confusion to the student as to which email was used to SIGN UP onto the WIL PORTAL.
Students can also can use the CONTACT US menu provided to get help from the support team to investigate which email address was used upon Signing Up on the WIL PORTAL. The support team can help change the students Email address to their TUT4LIFE email that is required.
This message alert indicates that the student has not yet registered on the TUT ITS system. In order to Sign Up onto the WIL PORTAL, all students are required to FIRST register on the TUT ITS system then Sign Up on the WIL PORTAL PORTAL.
This message alert indicates that the Qualification that the student is attempting to register for is not yet populated on the WIL PORTAL. Students need to use the CONTACT US menu to contact the support team to do an investigation as to which qualification is not live on the WIL PORTAL.
Students can contact their Academic in order for them to change the start and end date. Academics can change the start and end date of a student from their profile.